Even More on Lights
Clamps
So how do we mount these lights? The lower the headlight
is mounted, the more effective it will be, since road irregularities
will cast long shadows from a light mounted well below eye level. A
fork with lowrider bosses provides a great spot for mounting dual lights.
Another advantage of having the lights mounted this low is one can use
a rain cape without obscuring the lights. Finally fork mounted lights
don't interfere with handlebar bags, or clutter the bars.
While most American lights are designed to mount on a
handlebar, most of the European lights have a fairly versatile bolt
through design and tend to come with clamps designed for fork crown
mounting. Sadly most of those fork crown mounts fail after a bit of
use. Hence the never-ending search for clamp nirvana!
The supernova lights come with a clamp that takes
a 6mm bolt through the fork crown and threads into the mount.
Of course none of my forks have this design, and I suspect most
high-end American bikes are the same. Several of our bikes with
cantilever brakes do have a threaded 5mm hole in the fork crown.
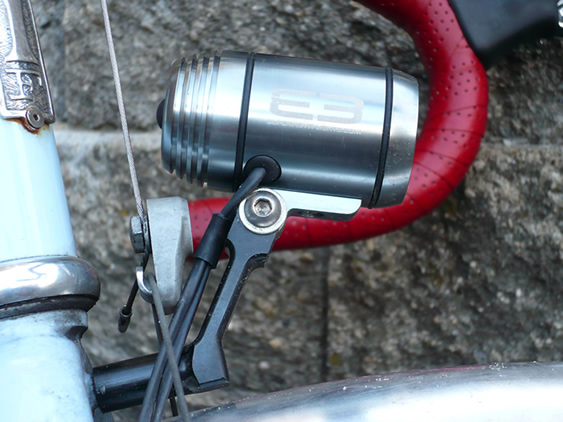
Below you can see a Supernova E3 mounted on fork crown bracket
that we ordered from sjscycles.
This is a very sturdy clamp and great if you have the type of
setup shown below - threaded hole and cantis. I have also drilled
out the threading in the supernova clamp, so I could pass a 5mm
bolt through to thread into the fork crown.
I mentioned earlier that an advantage of symmetrical beam patterns is
the ability to mount a light upsidedown - handy if you want the light
below the handlebars. This disadvantage is that water may get in through
outlets for cables if the light is upsidedown. The supernova lefty clamp
works well in this regard, since the light is still right side up, but
can mount hanging, just by changing the orientation of the lefty. Below
I am using the Schmidt R+M handlebar bracket. It is available from Peter
White, Harris,
and sjscycles.
I have mated the Schmidt bracket with a mount from Terracycle
so I can also use a handlebar mounted device, like the light shown,
a computer or GPS.
The Ixon Speed IQ pictured is a battery powered LED light
that I keep as backup on my commute bike. I highly recommend carrying
a backup light and power source. We crashed and busted our SON front
wheel on a double century once. We managed to acquire another wheel
to complete the ride, but it was not a dynamo wheel. Given the time
lost in th crash and other factors, we finished in the dark and had
to borrow lights and battery, since we lost our power source.
I use narrow handlebars, so I don't have a lot of space
to have lights and computers and such on the bars. Clamps like
the one pictures below allow me to keep handlebar space for hands!
I find that if I am using a single light, I prefer a central mounting
(rather than side of fork).

Bar mount options like those shown above simply
won't work with a handlebar bag. I have used Terracycle
clamps to make a long mount that drops from the stem and gets
the light below the bar bag.

The CYO (pictured above) is lightweight and the
clamp that comes with it has proven sturdy. I altered the mount
on the bag slightly to have it sit higher, clearing the light.
This has worked quite well.
St John Street have a lot of options on their site.
A lot of what follows are options we no longer use, since
we are now using a single center mounted headelight (no secondaries),
but for folks still using dual lights and looking for mounting
options, I'll include what we've done in the past.
My old brevet bike had both headlights mounted on the
lowrider bosses. To prevent damage to the contacts while adjusting the
angle of the lights, I had the light mounted to a short piece of stainless
steel and this is mounted to the frame. I also found some short rack
stays that worked well for this. The ones pictured below are actually
for a tubus rack! To aim the lights side to side, I bent the stainless
steel bracket. I've also found the washers for v-brake pads can work
nicely for setting side to side adjustment.


You can also get a plastic gizmo, like the Cronometro
NOB, designed for mounting computers on aerobars, that can be clamped
to a fork and then used with a handlebar mount for the light. I've used
these on a couple of bikes with carbon forks. Despite initial concerns
about slippage, I have experienced none. But I will stress that if you
mount lights anywhere a fork blade to take great care to tighten everything
and check regularly for any loose fittings. Having a light slip and
jam into the front wheel is not a pleasant experience! The design of
the Cronometro NOB is such that it will adjust to almost any shape and
size fork. And if your fork is carbon, I would recommend a protective
layer of rubber and regular inspections.
 
Below is a photo of a clamp for STI computers that may
also be used to mount euro style lights on a handlebar or round
surface like the NOB mentioned above, or any sort of remote access
bar. We had old unused aero bar clamps lying around and made remote
access bars from them and chopped handlebars. One of the nice
things about this design is that it is somewhat easy to move from
bike to bike, or remove/replace when packing. There are some ready
made devices like this, so you don't have to roll your own. I
tried the Minoura Space Grip and was found the first generation
version a pain to move from bike to bike and the second impossible
to install at all. I've also tried the Sidetrack Excess Access.
It is also a nice device, but may not work with some stems with
a wide clamp, since it attaches on either side of the stem. All
of these devices do take up some room on the handlebar, and may
require some cable routing adjustment and retaping of bars. If
you use narrow bars like I do, bar space is already at a premium.


Terracycle
have a lot of different mounting options for lights with handlebar
type mounts to go elsewhere.

|


